 Introduction
A Solar Box
1-19-9
Introduction
After replacing the solar panel on Andrea Lynn the question came up of what to do with it. On Andrea Lynn I had used it with a 12 volt battery to charge a cell phone and some NIMH batteries. Why not put it back to use for this?
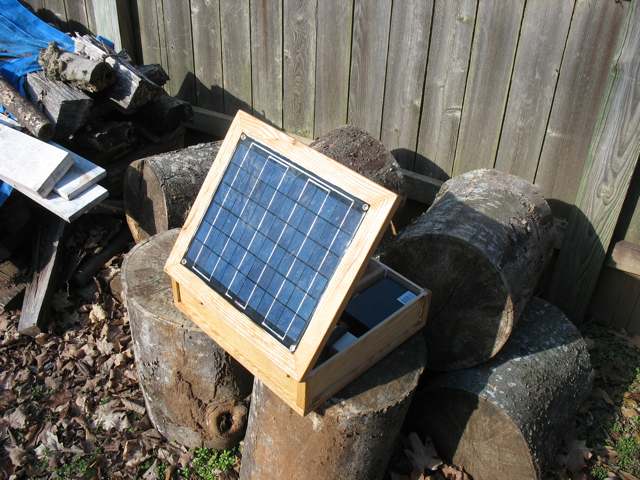
I soon realized that I could build a portable solar powered 12 volt dc source that would not need to be plugged into a wall socket ever. Pictured left is the result. This page will cover the design and construction of this unit. It will conclude with test results.
The design
I'll discuss the design of the electrical system. The design of the box largely followed the choice of electrical components. All of the design choices and parameters hinged on the solar panel itself. It is a 12 watt Sunwise Solcharger. I started out picking a good small battery that could be charged from nearly flat to full in one good sunny day. Yet it had to be big enough to be able to charge a cell phone and some NIMH batteries. This 12 watt solar panel can put out roughly 5 amp hours of electricity per day if I go by the rule of thumb to use for solar panels. Thus the battery had to be at least 5 amp hours. Given that batteries don't do well to be run completely flat it had to have some reserve capacity. I picked 7.5 amp hours. It had to be 12 volts DC like a car battery. A regular lead acid battery would tend to be messy though as it likes to be standing up. The box would not necessarily be in one orientation. There would be the risk of spillage of acid which could cause all sorts of corrosion. Instead I chose an AGM battery. This type can be placed in any orientation and will not spill under any normal circumstance.
With the battery chosen I realized that I needed a solar charge controller. This is because the solar panel is large in relation to the battery. I picked a Morningstar 4.5 amp charge controller. This fit the requirements but allowed for possible future expansion.
I completed the basic setup with a couple of 12 volt DC plug sockets and a fuse.
Construction
Next I thought about the box. I wanted a small antique looking box. I thought things through and finally settled on ash. I had some ash laying around. I bought some more to provide enough. After spending an afternoon at the table saw I cut the pieces to make the box shown above. The top is a frame of ¾ by 1 ½ inch with a rabbet for the panel. The bottom is framed similarly but with a floating ¼ inch panel. The side walls are 1/4” thick ash that I ripped and planed. I glued the frames up with epoxy. I glued in the panels with 3M 5200 fast set so that they can expand and contract without splitting or distorting the box. I then glued in the solar panel with 5200. I put a coat of varnish on. After fitting hinges, a magnetic catch, and a limit rope the box was done. I hacked up a temporary partition to hold the DC plugs and separate the electrical part of the box from the storage part. After I work out all the features I will build a nicer partition. As far as looking antique it came up a little short. Maybe I'll do better next time.
I glued in a bus strip, wired up the battery, panel, controller and fuse. I picked a slow blow 4 amp fuse. It is always a good idea to have a fuse since there is the possibility of shorting things out.
I finished before the Christmas break. I took it with me to DC to try out. It charged the cell phone decently. However most of the time it was overcast so the box did not get a lot of sun. I checked the battery with a digital voltmeter. When I started out the battery was at 12.6 volts. It dropped down to 12.0 volts during the week.
The next step was to figure out how to indicate how much sunlight it got and how much it was putting out. After tinkering a bit I settled on using a Crompton Instruments ammeter for the solar input. I picked this up at Mikes Merchandise for $3. It was wired up to indicate up to 100 amps at full scale deflection. At that point it had a voltage drop of 50mv. I disassembled it and wired in a shunt of 9” of 22 guage wire to give a full scale deflection of 1 amp with 15mv. This makes a fine indicator of solar panel performance while taking the least possible amount of energy to do so. So far I have seen up to 60% deflection. Comparisons with a test meter show that I was fairly close on the calibration.
To measure charging output I used a “Watts-Up” module from http://www.rc-electronics-usa.com. At one point I accidentally shorted the load terminals after hooking up the source terminals. I thought I had fried this unit. After replacing the fuse it started working again. From what I can gather this is an extremely robust device. It measures current and voltage continuously. It also measures amp hours by sampling the current and integrating over time. This gives a real good indication of how much of the battery charge was used in charging the cell phone and NIMH batteries.
Test results
The solar panel exposure is shown here:
Full sun – 60%
Full sun under windshield 40%
Full sun under slight shadows of trees 30%
Light overcast 10%
Heavy overcast 2-5%
Some charging performance is shown here:
|
Item |
Test |
Amp hours |
|
Cell phone |
Test 1 |
160 mAH |
|
|
Test 2 |
70 mAH |
|
|
Test 3 |
148 mAH |
|
AAA NIMH batteries (3) |
Test 1 |
413 mAH |
Purpose
Why even do this? Besides reusing the solar panel it provides an off grid means of charging small electronic devices. It would be perfect for a camping trip or a remote cabin. It also provides an experimental platform for furthering my understanding of how solar panel powered systems work in the real world. There are several products on the market similar to this but they don't really admit to being modified or enhanced.
Future directions
I plan to add a couple of LED lights that are mounted on flexible stalks. This would provide illumination at night or after a power outage. I am considering adding a series of 6 watt solar panels that are sewn onto a canvas strip. I would use these to help charge the battery when it is overcast. Later on I will use the knowledge gained to design and build larger off grid systems for powering a computer, radio, television, or small refrigerator.